
 Hi all! Are you interested in starting your own vegetable garden but don’t know where to begin? Stay tuned to find out! First off, congratulations! As cheesy or broccoli as this may sound, gardening can be a very enriching and rewarding experience. What other activity can help feed you, connect you back to nature, make you and anyone you share with around you more healthy? Where should you begin?
Start small Dream BIG
I started off my gardening experiences by drawing out a map of my entire yard, and envisioned filling each and every inch! From herb spirals to fruit forests, I was going to transform my 1/3 of an acre plot into a lush food forest. I envisioned eating nothing but the fruits of my labor. This did not end up happening. However, this did provide for the excitement to continue the process and look further into how I can grow my garden, my skills, and deepen my enjoyment for the craft.
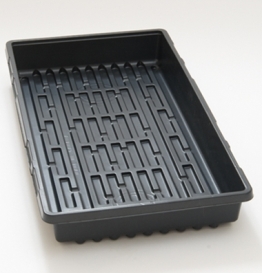
I suggest if you want to start gardening, go to your local gardening supply store and buy one or a few starter kits. These will include a 10″ x 20″ tray with a clear plastic top. Don’t worry too much about getting fancy and buying a Ph test kit or anything along those lines. The starter kit should do, however, I’m not the biggest fan of plastic, and if you share a similar sentiment, any old baking tray will do with a thin piece of glass. Primarily you want something that once you put soil into, and lay down your seeds, you can place a clear film over the top of your container, to help trap in moisture and maintain humidity levels in order to assist the germination process. WARNING: If left for too long, this can easily lead to rot, so, once you see green, it is usually a safe bet to remove the clear film over your growing container.
Although each plant is different in its growing needs, many plants can survive well in soils with a Ph in the range of 6.0 – 7.5, which many will be able to find. Simply go to a spot in your yard and dig up as much dirt as you think you will need to get started. A quick note, please call Dig Safe at: 811. Please do this in order to prevent damaging electrical lines, underground plumbing, or anything else which is not intended to be dug.
Once you have your container, cover, and your dirt, you need some seeds. I have found that growing radishes, potatoes, various lettuces (spinach isn’t too bad either), and tomatoes seem to be relatively straightforward to grow. Although, experimenting with different veggies/herbs/fruits is one of the most exciting parts of gardening.
Once you have your set up ready to go, you may soak your seeds in water for 24 to 48 hours to assist in the germination process or directly sow the seeds. I am a HUGE fan of Permaculture, and Masanobu Fukuoka, who believes that laying the seeds on top of the dirt is the quickest, easiest, and most natural form of sowing seeds, however, if you have to bury the seeds, a toothpick or pen/pencil work well for creating a hole. You usually need not bury them more than 1/4″ below the soil level and gently cover them with dirt.
Now I would soak your soil with water. A good rule of thumb for many plants is to water them daily, however, many plants are very temperamental. This is where observation is one of your most powerful tools. If your plants sprout up but ever look wilty, add water until the color of the soil changes. This is very vague advice but should suffice to keep your plants alive. Try not to let them get to this point. This is where the one-day rule works well.
Now that you have gotten your veggies started, you need to find a sunny spot in your home which is roughly 60 – 80 degrees Fahrenheit. Many veggies like to be nice and toasty when they start but can tolerate temperatures lower than 60 degrees F.
Here’s where you get to get down and dirty. Decide how you want to design your garden bed. Do you want it to be a raised bed? Mix in with yard plants like Rhododendrons? Or get creative with something like a hugelkultur bed? I suggest a raised bed since it only requires a few boards (or none at all!) and some soil. I recommend not making the bed any wider than two times as long as your arm from your arm pit to your longest finger so that you need not climb into your bed to harvest veggies.
Now, once your veggies have grown in your starter container to about a couple inches high, and the average outside temperature is 55 – 60 degrees F or higher out, it is usually safe to plant them outside!
Now don’t forget to water them! Keep a close eye on them, and, oh yea! Make sure the spot of your raised garden bed is in a sunny location in your yard! Your next steps are to observe the beauty of nature, de-weed whenever anything comes up, and troubleshoot any problems like white rot fungus (usually a mixture of 9 parts milk to 1 part water will do).
Finally, after a couple to few months, you will have a plentiful harvest, ripe for the pickin’.
A few items to note
DO NOT USE PESTICIDES OR SYNTHETIC FERTILIZERS. I’m not huge into telling people what to do or not do, however, if you are going to garden, going organic is the healthiest option for you. There are some nasty side-effects involved with using synthetic pesticides, fertilizers, herbicides, etc. Besides, you wouldn’t pour petroleum over your garden, so why use pesticides (they are both derivative of fossil fuels).
DO use compost. A quick and easy compost to make is banana peels, coffee grinds, and egg shells. Smash all this up, through it outside, and if you cover it with a plastic sheeting, you may reach temperatures over 114 degrees F (which can kill off many bad bacteria). This is called thermophilic composting. After the two weeks, your homemade compost should be ready to go into your garden for a nice boost!
Patience is key. Protracted observation will be one of the most important skills to develop while gardening. Many issues can self-correct, or be identified through protracted observation.
Remember, failure is very possible and serves as a critical learning tool for what to and what not to do. Do not take a plant dying as you having a “brown thumb” bur more as an opportunity to self-correct. There are many aspects to gardening/farming that even master-gardeners, and life-long farmers are puzzled by to this day.
Enjoy the process. As stated above, gardening can be one of the most enjoyable experiences and is a great hobby at the least to pick up and develop.
Let me know how the process goes and I would love to see progress photos!
GROW ON!
